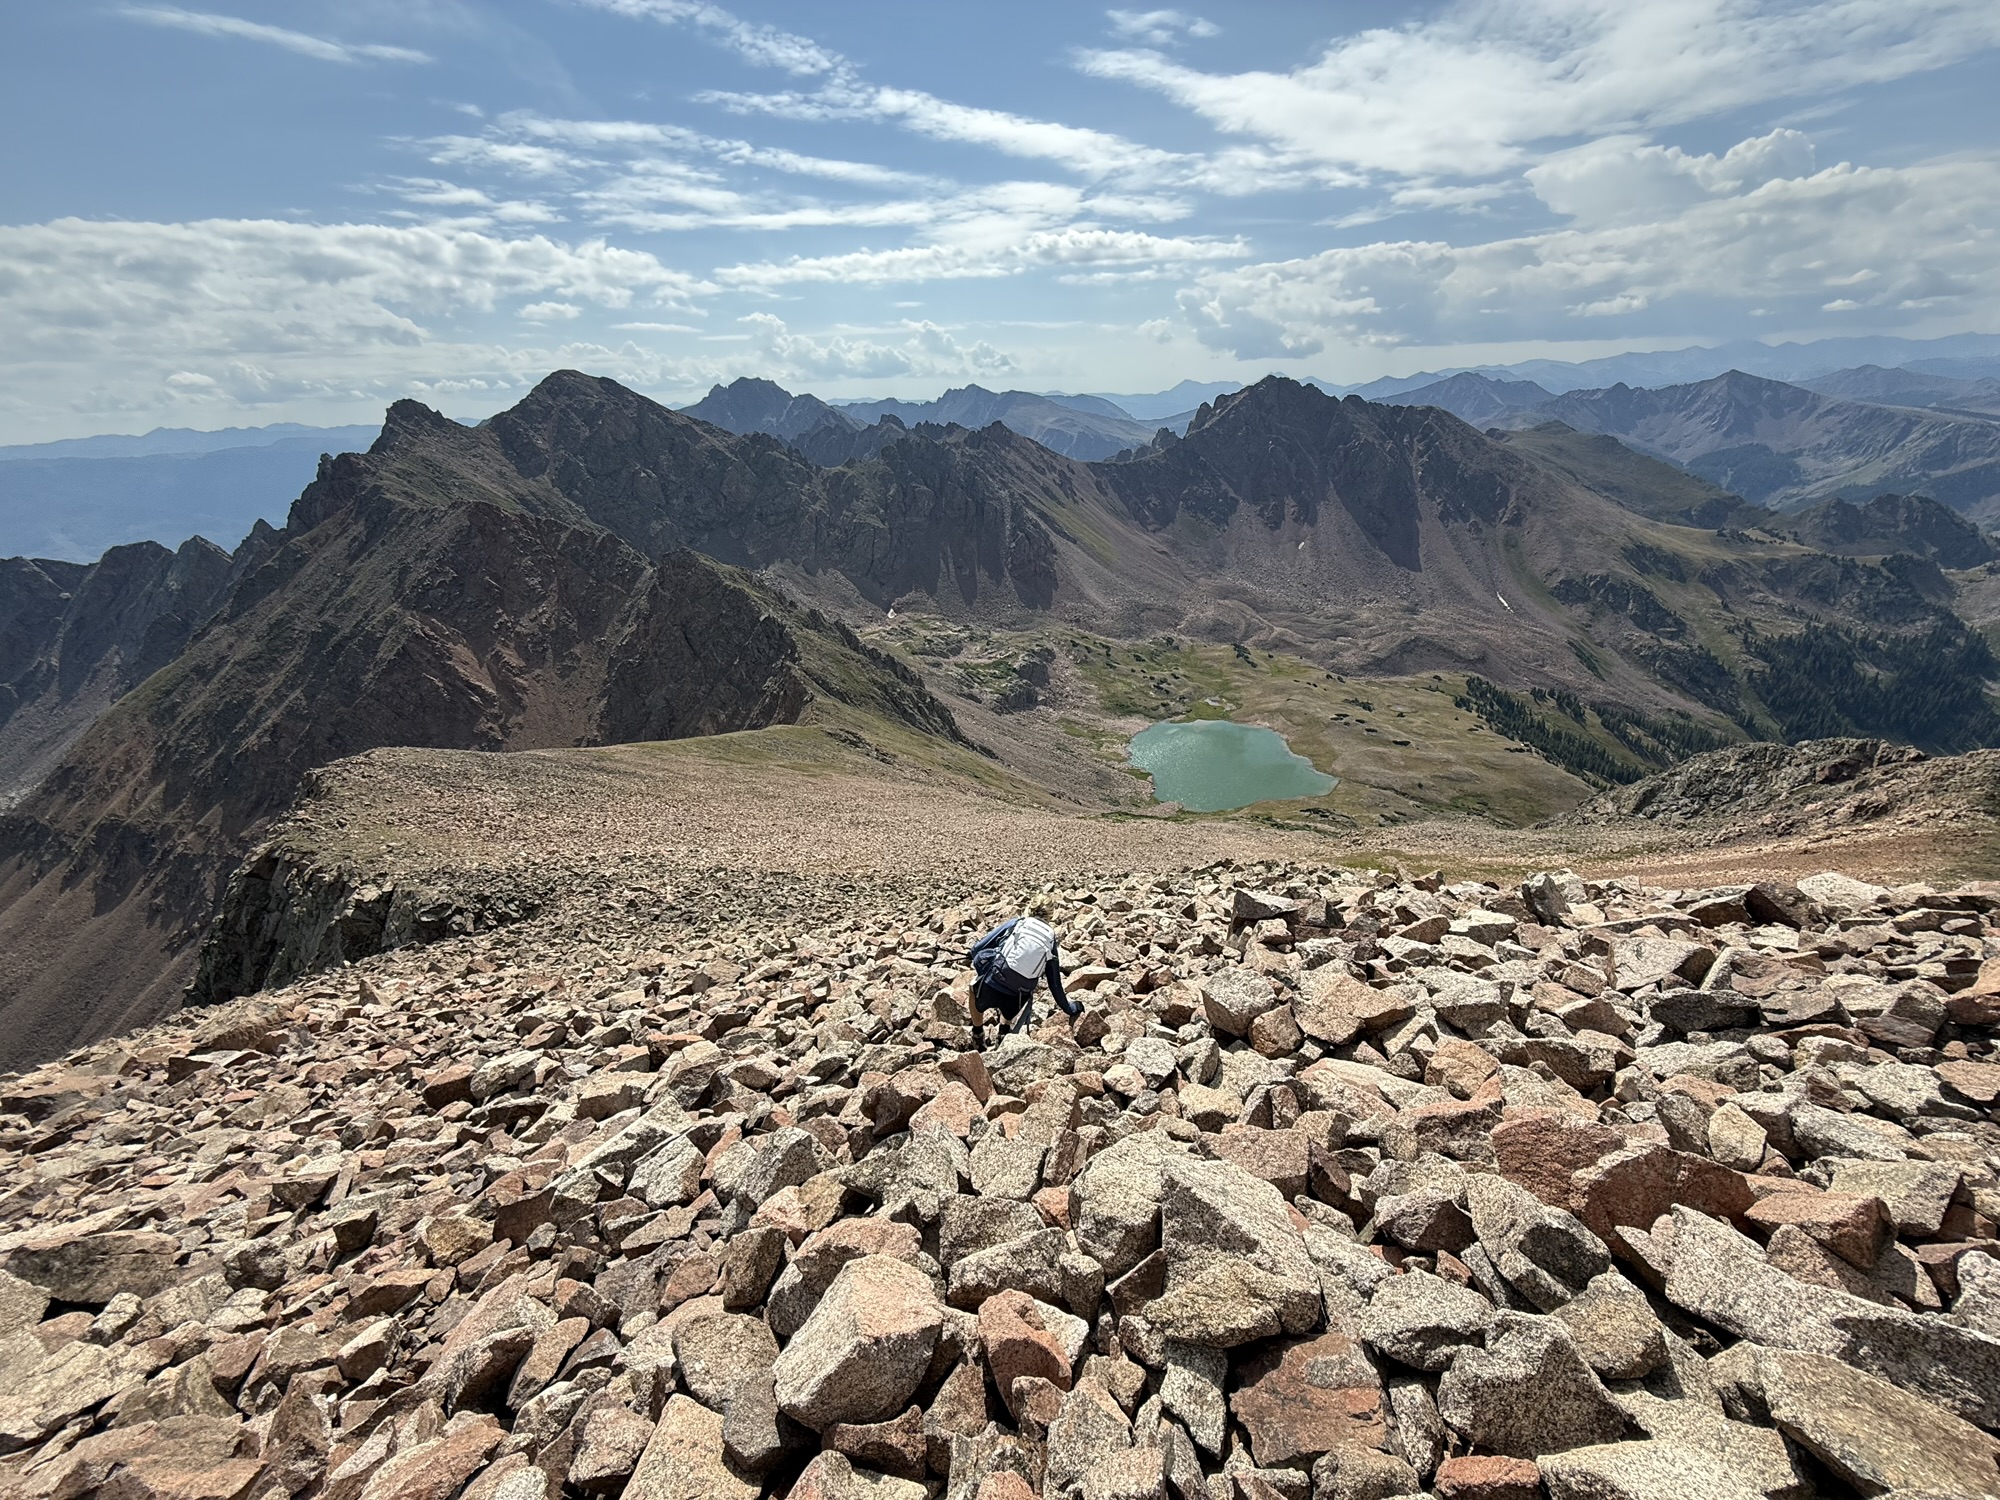
Here’s everything you need to know about getting to the top of Grand Traverse from Deluge Lake.
The challenge with getting to the top of Grand Traverse Peak outside of Vail, Colorado is that it’s sentimental for so many people, yet the front side is pretty difficult for anyone who’s not a technical climber or experienced route finder.
Table of Contents for the Full Context of Why This Is Sentimental
- Part I: Nineteen years-old with a one-way ticket to Vail, no job, no house, and no plan
- Part II: Returning to Vail for the first time in 30 years, failing to summit Grand Traverse, and my daughter heads to CU Boulder
- Part III: Bucket list trip to Vail 32 years later with Rori
- Part IV: Attempting to summit Grand Traverse Peak with my daughter
- Part V: Reaching the top of Grand Traverse Peak!
- Part VI: A photo guide to summiting Grand Traverse Peak from Deluge Lake for non-technical hikers
- Part VII: Celebrating with a gondola ride and a sentimental walk around Vail
- Part VIII: Meeting a kindred spirit by chance – an EPIC Gore Range moment
- Part IX: Recreating a few fun 1994 memories with photos
- Part X: Saying goodbye to the Gore Range and closing a chapter
Full guide on how summit Grand Traverse Peak from Deluge Lake
Most reports online about scaling the Grand Traverse are from bonafide adventurers who scramble technical terrain across along the “Grand Traverse” ridge. These folks go up Bighorn Creek and ascend North Traverse first. Then they navigate the ridge (the traverse) to Grand Traverse Peak, high five each other… and walk down the hill on the backside to Deluge Lake. They use Deluge as the easy exit, not their approach.
If you would like to see a few examples of this very difficult side of the doing the traverse, these are worth skimming, because it’s a refresher on what makes this area so spectacular. This is NOT what we’re doing. It’s just fun context.
- https://stuckintherockies.com/2010/06/the-gore-grand-traverse
- https://14erskiers.com/blog/2015/08/backpacking-in-the-gore-mount-valhalla-grand-traverse-peak/
- https://www.summitpost.org/the-grand-traverse-a-gore-range-scramblefest/440319
- https://www.summitpost.org/grand-traverse-peak/152789
- https://www.youtube.com/watch?v=gx4bHICiPuU
I repeat, that’s not what we’re doing here. Before we get into my how-to guide, here’s a well-made video by John Albert of the easier way to get to the top: hike to Deluge Lake and then walk up a very steep hill to Grand Traverse Peak. It’s exactly what we’ll be covering here. Here’s another site that covers this same Deluge Lake route to the top, if you’re collecting bookmarks. It’s always worth researching as much as possible.
This post is to help non-technical hikers find their way up this glorious and sentimental mountain from Deluge Lake trail. Here’s how to do it!
Step One: Get To Deluge Lake

Keep a close eye on the weather forecast. We didn’t get to acclimatize as much as I’d like because storms were coming in the next day. With only 12 hours in Vail before hiking, we went slow on purpose and it was worth it to pace in the beginning. There is no shame in the game to using All Trails for the Deluge Lake portion of the journey: https://www.alltrails.com/explore/trail/us/colorado/deluge-lake-trail
For 2026 readers (who knows what things will be like in the future)… I recommend downloading the AllTrails map locally onto your phone. Switch to airplane mode during the hike, and GPS will still work, while saving batteries.
Again, for 2026, I used ChatGPT (5.6 Sol High) and Claude Code (Opus 5 Max) to help me compile and aggregate several hourly forecasts each day for the week before we made the attempt. I’m glad I did because we had to change our plans and hike a day earlier that we originally planned. I recommend giving GPT or Claude (paid plan with a decent model selected) a bunch of reports and having the system build an combined recommendation (soon, this tech will be outdated, so take it with a grand of salt). The point is, keep a close eye on the hourly weather.
To guesstimate the temperature at the summit, I deducted 5 degrees per 1000 feet. So the summit is 15-20 degrees colder than the town of Vail at any given moment (if I’m calculating correctly).
There is snow on the route for a large part of the year. For example, I could not do it in June, so I snowshoed up the Big Horn side as far as I could as a consolation journey two years earlier. If for some reason you are only able to try to summit while there is snow on the ground, or you simply don’t feel comfortable, I’d highly recommend Paragon Guides. They will get you to the top safely.
For more context of the hike to Deluge, here’s a full recap of when my daughter and I hiked to Deluge Lake on the way to Grand Traverse. Again, it’s also worth reading the All Trails descriptions for Deluge Lake.
Park at the Gore Creek campground, and I recommend getting there as early as you can. My daughter and I got to the trailhead at 4:30 AM on a Wednesday in August. There were about four cars there and tons of open spaces. Avoid weekends.
We got to the lake at around 8:15 AM… just under four hours to get there. We kept a slow and steady pace the entire way with no substantial stops. I took breaks because I only had twelve hours to adjust to the altitude from literally sea level (I live at the beach). This is NOT the way to do it. If possible, spend three days or more in Vail before the hike.


There are two or three talus crossings that are not difficult and have visible paths across them. Otherwise, most of the hike to Deluge Lake is a pretty wooded walk… with a consistent relentless climb. Nothing crazy, but it’s not a flat trail and you have to climb a lot of rocks that are much higher than stair steps.
The final approach to the lake starts with a meadow and stream. You’ll think you’re almost there for a long time… just keep walking and climbing. We were lucky and no bugs at all for the entire hike. Most people report very bad bugs. I have no idea how we dodged that nuisance. So prepare accordingly.


Step two: Identify the Approach Up To Grand Traverse
The approach to Grand Traverse is to the left (North) of the lake as you come up the trail. A lot of hills prior to the lake look similar, but you’ll know once you reach the lake. You want to identify the rock slide and the sloping ridge to the “mound” that is the summit of Grand Traverse.

In the two videos below, you can see the rockslide strip that marks the spot below Grand Traverse, where you’ll climb up the hill. Since they are videos, you can get the entire context of the surrounding area. It’s a hill. Not a crazy mountain. But it’s so steep that if you don’t follow this plan, you can get a bit stuck, boxed in, or at least uncomfortable with the loose stones and larger rock features blocking your way up.

Be sure to look at the route on maps a lot to get the idea of the orientation. For example, above. You’re coming up the back of the mountain at an angle. Vail is in the top right of this image. We’re looking over the back side of Grand Traverse in this photo. Look closely, and you’ll see I drew a yellow arrow of the climb to the summit.
Step Three: Climb up the steep grass to the left of the rock slide, cross the rock slide as soon as possible (left to right straight across), and keep climbing to the top of the ridge.


The video (below) was taken at the exact spot where you want to cross the rocks. Unfortunately we didn’t realize this on the way up… and we kept climbing too far and got a bit stuck. Cross the first opportunity you can to cut to the other side and reach the grass. Cute pikas chirping in the background.


Step Four: Walk up the ridge to the summit. It’s rocky, but significantly more stable than the grassy slope.
Now you just have to walk/climb up tons and tons of talus. The good news is it’s very stable AND you can see the top of Grand Traverse. Think of it as a gigantic staircase.
As long as you’ve left enough time to get to the top, and as long as the weather is good… you just need need to put one foot in front of the other and you win.
For example, I wish we’d had less time pressure. The forecast called for storms at 11 AM, and we reached the summit at 10:04. It would have been great to stop for lunch or enjoy the moment longer. When in doubt, get started earlier so you can savor the moment and take breaks.


You’ve got this. Just keep climbing… here’s the final stretch (below video). The rocks are exceptionally stable (within reason)… and watching your step is the biggest piece of the puzzle. Slow and steady ,and you’re up there.
Step Five: Smile. Soak in the view and enjoy it.
As you get to the top of the summit, you’ll know you’re there when you suddenly see I-70 and realize “Holy crow, this is it”. This video will give you some perspective of just how cool it is. The difference between ‘almost there’ and ‘standing at the top’ is the same as experiencing a partial eclipse v. totality. This is totality. It’s awesome.

It’s a breathtaking spot. If you’re a Vail local or have a ski-bum sentimental reason for climbing to the top like me, it’s overwhelming. However I must say, the views in the other directions are equally if not more gorgeous. You are in the sea of the Gore peaks and the little lakes are super pretty. Thanks to Deluge Lake, you never get disoriented. It’s a very safe off-trail excursion in that sense.


Step Six: Come down, and ignore your quads turning to Jell-o


Like any good hike, the walk back feels 8x as far as the way up. I am not sure how to help with that, other than it’s pretty, and you are very happy.


Table of Contents
- Part I: Nineteen years-old with a one-way ticket to Vail, no job, no house, and no plan
- Part II: Returning to Vail for the first time in 30 years, failing to summit Grand Traverse, and my daughter heads to CU Boulder
- Part III: Bucket list trip to Vail 32 years later with Rori
- Part IV: Attempting to summit Grand Traverse Peak with my daughter
- Part V: Reaching the top of Grand Traverse Peak!
- Part VI: A photo guide to summiting Grand Traverse Peak from Deluge Lake for non-technical hikers
- Part VII: Celebrating with a gondola ride and a sentimental walk around Vail
- Part VIII: Meeting a kindred spirit by chance – an EPIC Gore Range moment
- Part IX: Recreating a few fun 1994 memories with photos
- Part X: Saying goodbye to the Gore Range and closing a chapter

Leave a Reply